Tag

Google Analytics 4

Browsing

Google is crucial to the success of online marketing for any business. In the present world, there is no denying that — Google is one of the major sources where people discover and visit your website; therefore, optimizing all your marketing efforts to appear highly in search engine result pages (SERPs) makes sense. A plethora of web tools are available in the market to optimize your website, including – SEO tools, content management systems (CMS) tools, cybersecurity tools, image optimization tools, page speed tools, and many more. However, few web analytics tools are more useful for marketing. 

Given how important Google is for your marketing, it only makes sense that Google has released a few different tools over the years to help you manage all your marketing campaigns. If you’re looking for an analytics tool for your website, you might have heard of “Google Search Console vs “Google Analytics a million times. If you want to know more about these two platforms, keep reading this blog. 

Difference Between Google Search Console (GSC) vs. Google Analytics (GA): A Brief Overview 

Both Google Search Console (GSC) and Google Analytics (GA) are products of Google. These two tools may appear to be similar from the surface, but do they really? In short, the answer is “no,” but knowing “why” is more complicated.  

Therefore, to help you understand these web analytics tools, we will briefly overview GSC vs. GA, including what they are, what they do, and how they differ. Let’s dive in! 

What is Google Search Console (GSC)? 

Originally known as Google Webmaster Tools, Google Search Console (GSC) was launched by Google LLC in 2006. It was in 2015 when Google rebranded its name to “Google Search Console.” It offers many features to help users understand how search engines engage with your websites. This tool lets you analyze metrics and perform analytics related to your website exposure.  

Essentially, it lets you examine how your website appears in search results and helps you resolve any problems you discover. Google Search Console is FREE of cost, so you don’t have to pay anything for the subscription. Although, you need to verify the ownership of your website to start using GSC.  

Features: GSC primarily focuses on SEO metrics. There are currently many features that include: 

  • Keyword Monitoring: this includes what search terms, or “keywords,” people use to search to find your page. 
  • Crawl Rate Monitoring: crawl rate is how often crawls your website per second 
  • Security Issue Monitoring: This feature detects potential website flaws vulnerable to harmful malware or hackers. 
  • Website Speed Reports: This feature gives you data on the website and suggestions for site optimization and helps you speed up your page. 
  • Core Web Vitals Reporting: This feature shows how your webpage performs as per the real-world data. 
  • Sitemap Submission: A sitemap shows data on files and pages in a domain. 
  • A List of Internal and External Links for The Domain: this feature gives information on internal and external links pointing to your website. 

These are just a few of the most crucial metrics you can monitor with GSC. They are all directly related to SEO, which helps you understand the top priorities of this search console.  

What is Google Analytics (GA)?  

Google Analytics (GA) was made available to the public in August 2006. Initially, Google LLC rolled it out within a small network, but it wasn’t scalable. It was only in 2011 that Google made significant changes to this tool and rolled out another version in 2012 with the name “Universal Analytics.” Later, Google introduced several more versions, the most recent of which was Google Analytics 360 in 2016. 

Google Analytics (GA) is a free web analytics tool like GSC. You can monitor how people engage with different pages by viewing user data and activity on your website. In other words, GA is a fantastic web tool to keep up with traffic. As the name suggests, Google Analytics helps you in analyzing the data that’s been tracked. It gives you an easy way to visualize anything and obtain valuable insights by presenting its findings in charts and graphs. 

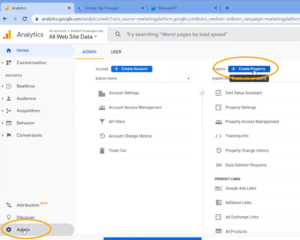
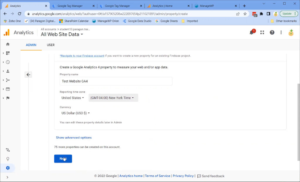
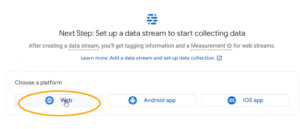
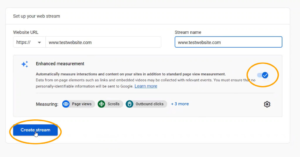
Features: From 2024, Google Analytics 4 will be known as GA4. Here are a few of the most notable features of GA4: 

  • Audience Monitoring: GA4 displays information about your website visitors with their age, gender, and location 
  • Custom Reports: GA4 lets you create reports for each marketing channel, allowing you to monitor the metrics that matter most to you.  
  • Visitor Count:  you can see the number of people visiting your website. 
  • Conversion Rate: you can see the number of site visitors converted to potential leads. 
  • Time Spent on Site: you can see the total time people spent on your site. 
  • Bounce Rate: you can see the number of people leaving your site as soon as they arrive 
  • Goal Monitoring: you can use this feature to set goals and monitor your progress. 


So, Which Tool Should You Choose, Google Search Console or Google Analytics? 

The answer is simple: Both! 

This is not an either/or situation — GSC and GA4 focus on entirely separate areas, and since both are free, you don’t necessarily have to invest in both. There’s no excuse not to use these two fantastic web analytics tools. 

You can use your Google account to link these tools together. This lets them communicate with each other and exchange vital information, making both helpful to you. Simply put, you should use — Google Search Console to ‘FUEL YOUR SEO EFFORTS’ and — Google Analytics to ‘ENHANCE YOUR WEB DESIGN.’  

If you want to put Google Search Console and Google Analytics tools to good use, then contact our SEO Consultants at Ultimate SEO Help. They will help improve your SEO and web design. Thank You! 


Welcome to the digital world where tracking website performance is crucial for success. Whether you’ve been using web analytics tools for a long time or are a beginner and have recently hopped into the online world, you will need a web analytics tool to monitor your website’s performance. Google’s tools are among the most widely used because of their widespread availability of free versions. The most recent update in Google Analytics’ toolkit is “Google Analytics 4”.  

Google Analytics 4 (GT4) provides a robust, event-based approach to monitor website activities. Unfortunately, due to the deprecation of Universal Analytics, many marketers were forced to re-learn their preferred analytics platform, navigating a completely new setup procedure and a drastically different UI.  

Fortunately, Google Tag Manager (GTM) can make the setup procedure of GT4 on your website easy and reduce the need to customize codes. In this article, we will walk you through the basic setup of GT4 tracking code using GTM! 

Google Analytics 4 vs. Google Tag Manager: What Is the Difference? 

Google Analytics (GT4) and Google Tag Manager (GTM) are two completely different tools that work alongside to provide you with the information you need to make wise marketing decisions. 

  • Google Tag Manager (GTM) – stores and manages code that functions as a container. The tag manager does not offer any options for data analysis or reporting. 
  • Google Analytics 4 (GA4) – is used to analyze data. You can access all reporting in Google Analytics, including sales, engagement conversions, user reports, and more. 

To understand why you need GTM in addition to GA4, you need to understand its features and dig deeper into the topic. 

Getting Started with Google Analytics (GA4) using Google Tag Manager (GTM): Full Step-By-Step Beginner’s Guide  

Setting up Google Analytics 4, is quite overwhelming! We’re providing an easy step-by-step beginner’s guide for configuring GA4 with Google Tag Manager to get you started. 

Step #1. Create a New Google Analytics 4 Property 

Firstly, sign into your Google Analytics account. Head over to the “Admin” section and click “Create Property.” 

Google Analytics
Follow the prompts to set up GA4 property, entering details like your website name and industry category.
 

Google analytics  

Step #2. Create a Data Stream for GA4 Property 

Inside your GA4 property, locate the “Data Streams” section and create a new data stream for your website. Select the appropriate data stream type, “Web,” depending on your needs. 

Google Analytics

Google Analytics

Step #3. Enter The Measurement ID from the New Data Stream 

You will be provided with a Measurement ID during the data stream creation process. Take note of this ID, as you will need it for the GTM setup. 

Google Analytics

Step #4. Create a GA4 Configuration Tag in Google Tag Manager 

Log in to your GTM account and navigate to the Tags section. Create a new tag by clicking on “New Tag.” 

Google Analytics

Provide a name for your GA4 Configuration Tag. Choose the “Tag Configuration” option and select the Google Analytics: GA4 Configuration option. 

Google analytics

Step #5. Paste Measurement ID and Setup Tag Firing for all Pages 

In the GA4 Configuration Tag settings, paste the Measurement ID you obtained from the data stream creation.  

Google Analytics
Select the built-in trigger option “All Pages” and the Save to ensure the tag fires on all website pages.
 

Google analytics 

Step #6. Preview Your New Tag using GTM Preview Mode 

Before publishing your tag, previewing it to ensure it functions correctly is essential. GTM’s Preview Mode lets you see how the tag fires and captures real-time data without affecting real visitors. Test your tag across various pages and actions to ensure accurate tracking. 

Google analytics 

Enter the “Website URL” you want to connect for testing and click “Connect.” After this, your website will open and connect in another tab. 

Google analytics

Now, your new GA4 configuration tag appears with other tags on your website.  

Google analytics

Step #7. Publish New Tag in GTM 

Once you are satisfied with the tag’s functionality and tracking results in the preview mode, it’s time to publish the tag. Save your changes, click “Submit Changes,” and click “Publish” the container version containing the GA4 Configuration Tag. 

Google analytics

Step #8. Monitor GTM real-time reports 

After publishing the tag, keep an eye on your GTM real-time reports to verify that the GA4 data is being captured correctly. You can access these reports via the Real-Time section in your GTM account. It’s an excellent way to confirm that GA4 is successfully integrated with GTM and tracking user behavior effectively. 

Google analytics

Final Words 

After completing this whole process, you will effectively record data and events from your website to your new Google Analytics property and your current Universal Analytics property. This will prepare you for when Google stops collecting data through Universal Analytics.  

In your new GA4 property, set your goals and get conversion data for both properties. For more information on Google Analytics 4 (GT4) and Google Tag Manager (GTM), contact seo experts now! 

Google Analytics 4 (GA4) represents a significant shift from its predecessors, offering a more intuitive and user centric way of tracking websites and app analytics. In October 2021, Google revealed its most significant change in the next evolution of Google Analytics Software: Google Analytics 4 that has replaced Universal Analytics on July 11, 2023. Millions of users worldwide now rely on Google Analytics 4 (GA4) as their go-to web analytics tool.  

There is so much to learn from major updates and its normal to question how this may impact your job or business. Compared to previous iterations, GA4 is a completely revamped platform. GA4 brings advanced tracking and reporting features using machine learning model. Consequently, business owners can analyse their website performance across various platforms more precisely.  

Unfortunately, setting up GA4 is much harder and time consuming! That’s why in this article, we will discuss how to set up Google Analytics 4. 

What Is Google Analytics 4? 

Google Analytics 4, also known as GA4, is the next generation of Google Analytics1. It is a new kind of property designed to provide businesses with a comprehensive view of customer behaviour across both websites and apps. GA4 uses an event-based data model, which means it collects data based on user interactions (events) rather than session-based data like the previous versions of Google Analytics.  

In Google’s perspective, GA is designed to be the analytics programme of the future, with a primary emphasis on data visualisation and machine learning. Compared to UA, GA4 offers greater insights, predictive analytics, and data visualisations. 

Google Analytics 4 vs. Universal Analytics: What has Changed in The New Update? 

In short…. a LOT! 

GA4 features a very distinct data structure and data collection logic. Now, everything is built around events and users – not sessions, as we’re accustomed to. Every user interaction is treated as a separate event in an events-based approach. Earlier, we used a session-based approach, which categorised user interactions during a specified time period. Thus, this is a big change.  

Let’s learn about the changes made in new GA4 update by directly comparing it with Universal Analytics: 

  • Multi-platform Measurement: With GA4, you can collect data and track user interaction across multiple platforms like Websites, iOS and Android apps. This provides a comprehensive view of the customer journey across different devices. 
  • Privacy Configuration: GA4 offers privacy controls and configurations including features like “cookie less measurement, data deletion control, granular consent” that ensures website owners can save user data more ethically. Additionally, the platform will stop storing IP addresses. 
  • Event-based Tracking: In the new GA4, session-based tracking is replaced by event-based tracking allowing you to measure user behaviour and conversions allowing to have a complete view of user’s journey. 
  • Predictive Metrics: GA4 incorporates machine learning technology to provide predictive metrics and automated insights. This lets you predict the future behaviour of the user – like purchase or churn possibilities and revenue prediction.  

Thus, by switching to an “event-based model”, Google Analytics 4 has become more flexible and has improved its ability to predict user behaviour. 

How to Set Up GA4: Step-By-Step Guide 

There are two ways to set-up Google Analytics 4 – one with “Google Tag Manager (GTM)” and another by updating configuration settings by “Setup Assistant”.  

For new users, the Google Tag Manager method is the best option. Current users should migrate Universal Analytics with GA4 as they already have it installed. Here’s how to connect new GA4 using both the methods: 

#Method 1: Setup GA4 with GTM 

In this method, we will go over how to install Google Analytics 4 (GA4) with Google Tag Manager (GTM). Since this method is intended for new users, let’s begin by downloading GA4.  

  • STEP 1: Create GA4 Property 
  • Visit Google Analytics website and Sign In to your account 
  • Click on “Admin” and ensure that the correct account is selected 
  • Go to property column and click “+Create Property”  
  • Now, enter your website name, select a reporting time zone, currency, then click “Next” to create your GA4 property 
  • STEP 2: Configuring GA4 Property in GTM 
  • Open a new tab, and Sign In to your Google Tag Manager account 
  • Select your website’s container and click on Tags > New > Tag Configuration 
  • Choose “Google Analytics: GA4 Configuration” 
  • Enter your “Measurement ID” from your GA4 property 
  • STEP 3: Setup Triggers 
  • In GTM, under your GA4 Configuration tag, click on “Triggering” 
  • Select the triggers that determine when this tag will fire (e.g., All Pages for page views). 
  • STEP 4: Publish Changes In GTM 
  • Once your tags and triggers are set, click “Submit” to publish these changes. 
  • Name your version and click “Publish” 

#Method 2: Configure GT4 with Setup Assistant 

Owners of active Google Analytics accounts can simplify the configuration procedure with the help of the GA4 Setup Assistant.  

This is because you don’t have to modify your Universal Analytics account to create a new GA4 property. Then, both your new GA4 property and your current property will continue to gather data for your website. 

  • STEP 1: Access Setup Assistant 
  • Visit your Google Analytics account. 
  • Click on “Admin”, and under the “Account” column, select the correct account. 
  • In the “Property” column, find your Universal Analytics property and click on “GA4 Setup Assistant” 
  • STEP 2: Create a New GA4 Property 
  • In the Setup Assistant, click on “Get Started” under the “I want to create a new Google Analytics 4 property” section. 
  • Follow the prompts, and a new GA4 property will be created with basic settings
  • STEP 3: Link To Your Existing Data Streams 
  • The assistant will prompt you to link any existing data streams (like your website or app). 
  • Follow the instructions to ensure your data is accurately tracked 
  • STEP 4: Review Property Settings 
  • After setup, review your property settings. 
  • Adjust data collection settings, user property definitions, and events as needed 

Conclusion 

Whether you choose to set up GA4 using Google Tag Manager or the Setup Assistant, both methods offer a streamlined process to harness the power of Google Analytics 4. Remember, transitioning to GA4 is a significant step towards understanding your audience better and making data-driven decisions for your online presence. If you haven’t already, start using GA4.