

Welcome to the digital world where tracking website performance is crucial for success. Whether you’ve been using web analytics tools for a long time or are a beginner and have recently hopped into the online world, you will need a web analytics tool to monitor your website’s performance. Google’s tools are among the most widely used because of their widespread availability of free versions. The most recent update in Google Analytics’ toolkit is “Google Analytics 4”.
Google Analytics 4 (GT4) provides a robust, event-based approach to monitor website activities. Unfortunately, due to the deprecation of Universal Analytics, many marketers were forced to re-learn their preferred analytics platform, navigating a completely new setup procedure and a drastically different UI.
Fortunately, Google Tag Manager (GTM) can make the setup procedure of GT4 on your website easy and reduce the need to customize codes. In this article, we will walk you through the basic setup of GT4 tracking code using GTM!
Google Analytics 4 vs. Google Tag Manager: What Is the Difference?
Google Analytics (GT4) and Google Tag Manager (GTM) are two completely different tools that work alongside to provide you with the information you need to make wise marketing decisions.
- Google Tag Manager (GTM) – stores and manages code that functions as a container. The tag manager does not offer any options for data analysis or reporting.
- Google Analytics 4 (GA4) – is used to analyze data. You can access all reporting in Google Analytics, including sales, engagement conversions, user reports, and more.
To understand why you need GTM in addition to GA4, you need to understand its features and dig deeper into the topic.
Getting Started with Google Analytics (GA4) using Google Tag Manager (GTM): Full Step-By-Step Beginner’s Guide
Setting up Google Analytics 4, is quite overwhelming! We’re providing an easy step-by-step beginner’s guide for configuring GA4 with Google Tag Manager to get you started.
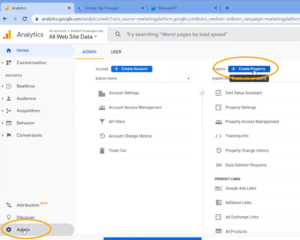
Step #1. Create a New Google Analytics 4 Property
Firstly, sign into your Google Analytics account. Head over to the “Admin” section and click “Create Property.”
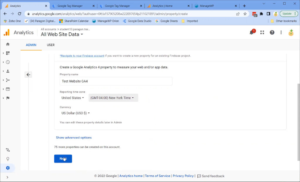
Follow the prompts to set up GA4 property, entering details like your website name and industry category.
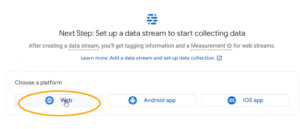
Step #2. Create a Data Stream for GA4 Property
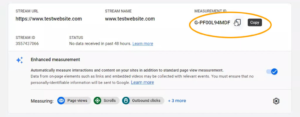
Inside your GA4 property, locate the “Data Streams” section and create a new data stream for your website. Select the appropriate data stream type, “Web,” depending on your needs.
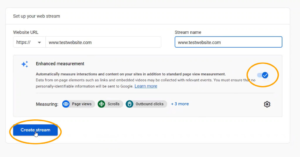
Step #3. Enter The Measurement ID from the New Data Stream
You will be provided with a Measurement ID during the data stream creation process. Take note of this ID, as you will need it for the GTM setup.
Step #4. Create a GA4 Configuration Tag in Google Tag Manager
Log in to your GTM account and navigate to the Tags section. Create a new tag by clicking on “New Tag.”
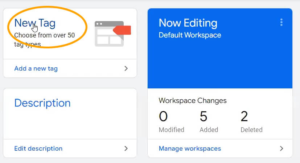
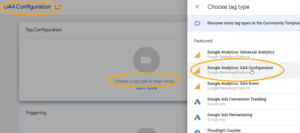
Provide a name for your GA4 Configuration Tag. Choose the “Tag Configuration” option and select the Google Analytics: GA4 Configuration option.
Step #5. Paste Measurement ID and Setup Tag Firing for all Pages
In the GA4 Configuration Tag settings, paste the Measurement ID you obtained from the data stream creation.
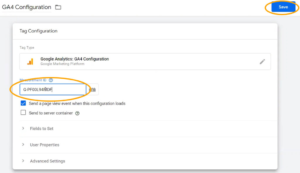
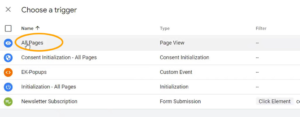
Select the built-in trigger option “All Pages” and the Save to ensure the tag fires on all website pages.
Step #6. Preview Your New Tag using GTM Preview Mode
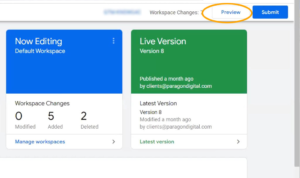
Before publishing your tag, previewing it to ensure it functions correctly is essential. GTM’s Preview Mode lets you see how the tag fires and captures real-time data without affecting real visitors. Test your tag across various pages and actions to ensure accurate tracking.
Enter the “Website URL” you want to connect for testing and click “Connect.” After this, your website will open and connect in another tab.

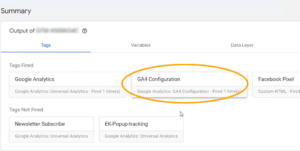
Now, your new GA4 configuration tag appears with other tags on your website.
Step #7. Publish New Tag in GTM
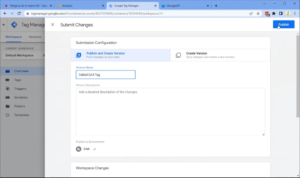
Once you are satisfied with the tag’s functionality and tracking results in the preview mode, it’s time to publish the tag. Save your changes, click “Submit Changes,” and click “Publish” the container version containing the GA4 Configuration Tag.
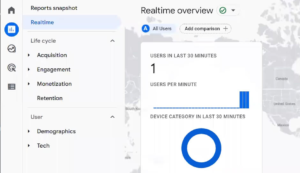
Step #8. Monitor GTM real-time reports
After publishing the tag, keep an eye on your GTM real-time reports to verify that the GA4 data is being captured correctly. You can access these reports via the Real-Time section in your GTM account. It’s an excellent way to confirm that GA4 is successfully integrated with GTM and tracking user behavior effectively.
Final Words
After completing this whole process, you will effectively record data and events from your website to your new Google Analytics property and your current Universal Analytics property. This will prepare you for when Google stops collecting data through Universal Analytics.
In your new GA4 property, set your goals and get conversion data for both properties. For more information on Google Analytics 4 (GT4) and Google Tag Manager (GTM), contact seo experts now!